|
Table of Contents
Starting
Basic character selection can take upwards of several hours - read the
manual! There are many abilities and limitations - especially if you choose to
multiclass your character.
- You start at first level but are "gifted" to third. Whether you
kill all monsters or none, you get two bonus level-ups before the end of the
prelude. Pick your class based on level 3 as an assumption.
- Use the <tab> key constantly. It will highlight not just characters or
monsters but also treasure. Monsters occasionally drop treasure when they
die and it's often too small to see, so use <tab> to illuminate all. Also
useful in rooms full of boxes or books to quickly spot something to examine
more closely. As a semi-cheat on entering a new room, open the door, quickly
pause the game and press <tab>. You'll get a complete view of all
monsters in the area.
- Traps traps traps. Locked doors, chests, and any treasure container you
could imagine. If you don't plan on creating a thief, grab a thief henchmen.
If you've taken a weak character and need a fighter henchman, try to grab
some basic thief skills. You'll run across all manners of traps and locked
items. Everywhere...
- The maps listed below aren't 100% complete. I've not bothered to document
common or basic areas. There are a number of "recycled" graphics, i.e.
the standard "empty house encounter" that can occur a half-dozen
times on one large map. No point in including it. Same for named, basic
areas - like taverns, stores, etc. These areas are all visible from the
overhead map and I've included names for key individuals along with
locations, so you can zero-in on the place you need to be.
- Once you've picked a henchman, keep the same one throughout the game.
There is an additional question - unique for each henchman, that will unfold
throughout the game. For additional details, please see
Reader's Feedback.
Reader's Feedback
This area is dedicated to the feedback received from other gamers.
I've separated it because I've not been able to verify it but, chances
are, it works as advertised.
- Henchmen quests. You can complete all henchmen quests by:
- Gathering all materials related to their quests (typically this
will be the unique items that you can't find any other use for...)
- Talk to the henchman as you level up (3 times, at least 6th
level)
- Provided you do not take the fourth reagant back to Aribeth, you
can complete each henchmen quest
- Individual henchmen quests & solutions. One thing I underestimated
was the number of quests for the henchman - it appears that there is a
quest per henchman, per chapter. Thanks to Daniel & friends for
summarizing:
Chapter One
- boddyknock - leaven bread recipe: bakers shop, peninsula
district
- daelan - brooch: bloodsailor ship, west side of docks
- grimgnaw - etched silver ring: house opposite entrance to
blacklake district in "no mans land"
- linu - silver chalise of moonbow: meldanan's laboratory,
blacklake district.
- sharwyn - celestial elixir: tanglebrook estate, peninsula
district
- tomi - fake documents: wagon repair shop, beggars district
Chapter Two
- boddyknock: prism blossom seed - creator ruins, level 1 (east of
port llast)
- daelan: notched axe - green griffon inn, motamin's challange,
level 3 (north of port llast)
- grimgnaw: corpse hand - arcane brothers tomb (north of port
llast)
- linu: journal of syth la'neral - cave of troll chieftain (east
of port llast)
- sharwyn: lock of nymph's hair, nymph's house, neverwinter deep
wood (east of port llast)
- tomi: star of calimshan - wanev's tower (south of port llast)
Chapter Three
- boddyknock: dragon's scale - bronze dragon cave, spine of the
world.
- daelan: uthgardt's spear - UNSOLVED.
- grimgnaw: etched dagger - vaath's camp, coldwood.
- linu: volcanis seed - outside creator ruins.
- sharwyn: tamorlyn's song - inside creator ruins, present.
- tomi: ashes of ancient hero - uthgardt fort, fort ilkard
homesteads.
Prelude
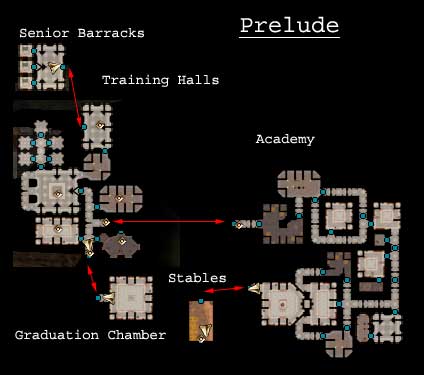
Senior Barracks
Starting point of the adventure. Search all rooms.
Characters
- Pavel
- Bim - Teaches you camera movement and angles
Exits
Training Halls
Meet and greet all types of experts who will teach your character how to
perform class-specific actions in addition to basic game mechanics. Beware of
the thieves area if you are *not* a thief - there are traps that could be
deadly. Once you've gone to the graduation chamber and setoff the appropriate
events, this area fills with monsters.
Characters
- Olgerd - Inventory and store buy/sell
- Berna - Map and journal
- Herban - Combat generalist
- Dendy - Combat, melee
- Hewwet - Combat, ranged
- Ferdinand - Keeper of exotic creatures; guards menagerie
- Jarco - Wizard training
- Ketta - Rogue training
- Elynwyd - Druid and cleric training
Exits
- West -> Senior Barracks
- South -> Graduation Chamber
- East -> Academy (locked, key from Aribeth/Graduation Chamber)
Graduation Chamber
Meet with Aribeth; chamber is attacked.
Characters
- Aribeth - Provides key to Academy
Exits
Academy
Basic character training. Lots of low-level monsters to practice all kinds of
skills on. You will also pickup a henchman by this point. The last area prior to
reaching the stables is the toughest battle yet - strong mage and many monsters.
Characters
- Geldar - provides you with a level up bonus
Exits
- North-West -> Training Halls
- South-West -> Stables
Stables
Realization that you are too late to save the creatures; large battle.
Characters
- Fenthick - provides you with a level up bonus
- Desther
Exits
- North -> Academy
- South -> City Core (Chapter 1)
Chapter One
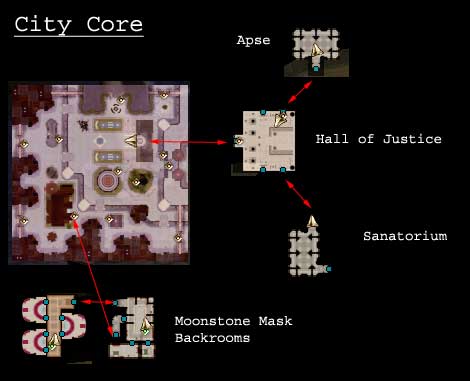
City Core
You begin in the Sanatorium and progress to the Hall of Justice, where you
again meet up with Aribeth. Details on the quest are provided; begin your search
in the Peninsula. Travel north to meet up with Oleff and receive the tomb quest.
Trade of Blades
All sorts of henchmen here. Hire one that is complimentary to your skillset.
Purchase district maps here. Graxx will sell you a gauntlet pass when pressed.
Moonstone Mask
Brothel... Meet Ophala Cheldarstorm who asks you to steal some art (quest).
You require a writ from Oleff to access the "special" backroom.
Shining Knights Arms and Armour
Purchase or sell basic equipment. Press Durga for access to premium equipment
and he'll provide a ward stone to the back door. Merrok provides recipe book for
making premium equipment.
Cloak Tower
Spellcasting guild - meet Eltoora Sarptyl.
Castle Never
Mulland the Admin prevents all access to the castle.
Characters
- Oleff - tomb quest; letter to provide proof to Briley in the Peninsula
district. Return to Oleff with each of the three items and he will reward
you. Oleff also "certifies" you for Ophala to provide access to
the Moonstone backrooms. Once you've retrieved all three items, he will
give you an amulet.
- Bethany - scared girl; cannot go home to Peninsula. First contact just
west of hall of justice.
- Myater - zoo quest; provides scroll and elixer to save zoo animals in
Blacklake district. First contact at the great tree
- Graxx - sells you a gauntlet pass. First contact at the trade of blades.
- Ophala - art theft quest. If you want access to the backroom, you will
have to buy a writ to give to Oleff.
- Merrok - premium equipment builder; provide magical items and special
ingredients and he will build something according to his recipe book.
- Eltoora - spellcasting guild
- Gilles - Plotting against Oleff. Revealed once you receive the tomb
quest. You can choose to sell the quest items to Gilles or confront him.
Confronting him gains Jacob's Quill (return to Oleff).
- Torgo - purchase pass coins for the backrooms.
- Tamora - Hoff quest. Wants to gain revenge against an abusive customer
(Hoff in the Docks area).
Exits
- North West -> Docks
- North -> Castle Never, impassable
- North East -> Blacklake
- East -> City Gates, impassable
- South West -> Peninsula
- South East -> Beggar's Nest
Peninsula
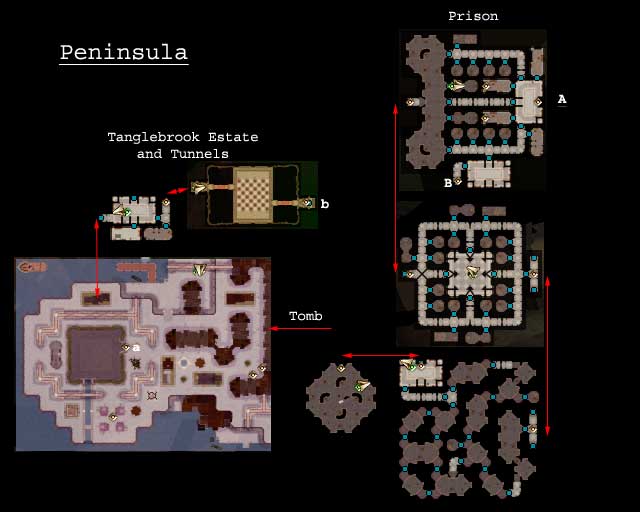
Be prepared for a lot of combat. You'll also have to watch any henchman you
have - they have a tendancy to runoff into the middle of a battle and continue
running as they see new monsters...
Tomb
Meet Briley; gain clarity in quest and three artifacts required to complete. Need
letter from Oleff.
Tanglebrook Estate
Access key to enter is under the "welcome mat". In one of the rooms
you'll find a "celestial elixir". There are a large
number of traps in the chess-room.
Prison
Access points from "a" or "b". "a" leads to
"A" while "b" leads to "B". You'll need to enter
the sewers to find the prison key that will open up section "a". There
are four levels to the prison. At the bottom, you'll find an intellect devourer.
Return the corpse to both Sedos and Aribeth. Note that this is an extremely
difficult battle - the intellect devourer will hop from body to body until there
are no more guards, and you can do only minimal damager per attack to it. Tough
battle!
Characters
- Briley - tomb quest clarity; requires letter from Oleff. Gain additional
artifacts required to complete.
- Sedos Sebile - prison quest; Sedos is in-charge of operation in
Peninsula. Gain information on accessing prison
Exits
- North -> City Core, South West
Blacklake
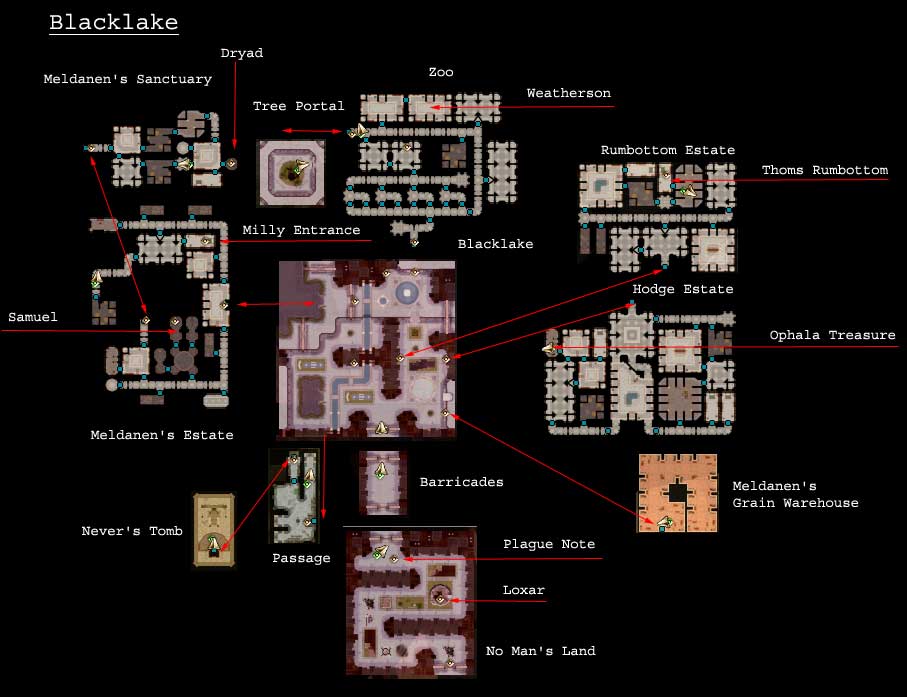
No Man's Land
The first area of Blacklake. This is the burned out, "lawless"
area. Near the northern gate you will find the suspicious plague note after the
main battle. Return the note to Aribeth and follow the instructions to talk to
Fenthick.
Characters
- Cendran - Loxar quest; asks you to kill a rogue half-orc named Loxar.
Loxar can be found in the tower in the middle of the map. Bring Loxar's
head back to Cendran for proof.
Exits
- North -> Barricades
- South -> City Core, North East
Barricades
Barrier to protect the "upper" class living in Blacklake from the
plague and bandits.
Characters
- Gate Captain Harn - talks about Meldanen the wizard and indicates you
should talk to Formosa (Blacklake core) for more information. Also, to
visit the zoo.
Exits
- North -> Blacklake main core
- South -> No Man's Land
Blacklake core
City core. Visit the Board Laid Bare tavern for the gauntlet quest. Explore
the south-west area for additional information on Meldanen as well as finding
the underground passage.
Characters
- Formosa - Meldane quest. Either retrieve the warehouse key or kill him.
- Milly - Meldane's cleaning lady. There is a portal in her house to gain
secret access to his estate.
- Weatherson - hunter in the zoo area.
- Punkin - passage access. Provides rudimentary password and dialogue
triggers for the bookshelf. Talk to her mother inside the house to gain
access to the passage. Password is "halueth".
- Thurin, Captain of the guard - Samuel quest; Samuel is a guard who has
gone missing. He can be found as a prisoner in Meldanen's Estate.
- Bartender of Board Laid Bare - gauntlet access. Provided you purchased a
gauntlet pass from Graxx in the Trade of Blades in the city core. If you
complete the gauntlet (3 wins and and then defeat Claudius), you'll own
the inn. See the bartender weekly for a small gold payout.
- Disgruntled Noblemen - found in the large house to the south-west.
Provides some background information on Meldanen. Mentions that he has
found a new young lady he is keeping for his amusement.
Exits
Zoo
Free the lion, wolf, panther, and brown bear if you have taken on the quest
from Myater in the City Core. Move to the tree portal, read the scroll as per
the instructions, and return to talk to each animal. They will find their way to
the portal. Return to Myater to complete the quest.
Passage
Secret access from the bookshelf in Punkin's house. Locked chests and doors.
Place ceremonial arrow (from Briley in Peninsula) in the chest near the door for
access to Never's Tomb.
Exits
- North -> Never's Tomb
- East -> Blacklake city core
Never's Tomb
Retrieve one of Never's artifacts. Nasty combat here - I never did beat the
dancing swords... Fastest and quickest method is to run straight to the tomb and
select to go to inventory, and pause the game. Grab everything and invoke the
stone to return back to Aribeth. Unpause game and return to the city core via
magic... Return the artifact to Oleff for a reward.
Exits
Meldanen's Estate
Several wizard apprentices along with various special monsters. Several
cannot be hit by normal weapons. You will find Samuel in one of the prison
cells.
Characters
- Grommin - Meldanen's not-so-bright servant. Pursuade him or use insight
to befriend him.
Exits
- East -> Blacklake city core
- "Milly" entrance -> One-way from Milly's house into
the estate.
Meldanen's Sanctum
You'll find a silver chalice of moonbow and dragon blood. You will have to find Meldanen but when he is seriously wounded,
you have the choice of negotiating for the key & dryad freedom or completing
the job. This is a tough fight - he is a very strong wizard and can not only
deal out substantial damage, but also paralyze or disable your characters. Once
you've completed this battle, free the dryad. Take her lock of hair back to
Aribeth. See Formosa with the warehouse key and silver tooth if you killed
Meldanen.
Rumbottom Estate
Contains one of the quest items for Ophala (city core).
Characters
- Thoms Rumbottom - provides background on Ophala relationship and
Portrait quest item. Return Portrait to Ophala for reward.
Hodge Estate
Contains one of the quest items for Ophala (city core). This estate is also
one of the nastiest trap-loaded areas anywhere in the game. Move with extreme
caution... Hodge has abandoned the estate; you will find a note from him
indicating the Urn quest treasure and background on Ophala relationship. Return
Urn to Ophala for reward.
Docks
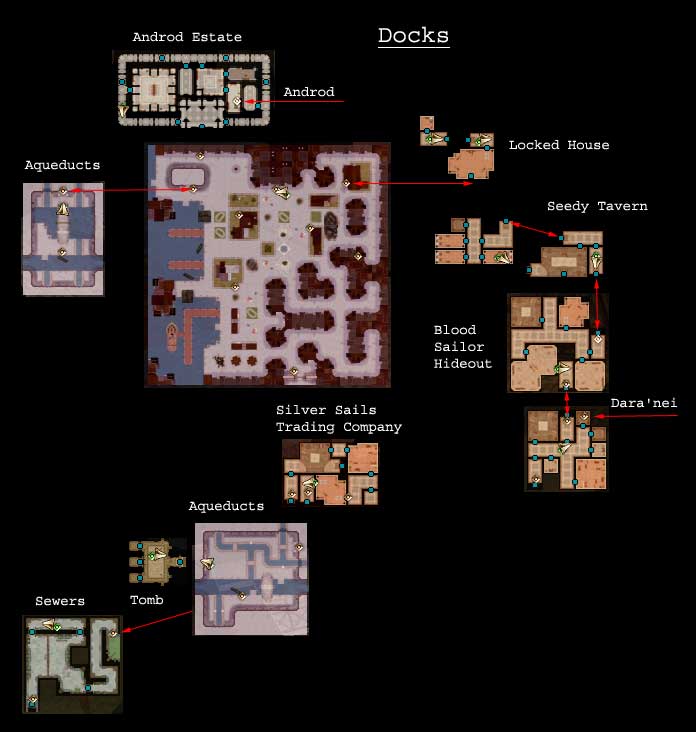
Meet with Gate Captain Soren to enter.
Characters
- Gate Captain Soren - allows access to Docks area.
- Neibor - simply follows you. Talks about an auction at the Seedy Tavern
where the rumours indicate it's a cure for the plague being auctioned off.
You will need an auction announcement and a blood sailor uniform (or
cash). Uniforms can be retrieved by killing the blood sailors guarding the
docks as well as in a few other areas.
- Jace - depressed individual. He burned his house as he lost his family
to the plague.
- Jerol - Storekeeper for the Twenty in a Quiver shop. Talks about
Smuggler's Coins and where to find them.
- Hemmel Masterson - Amulet quest. Callik stole his amulet
- Gilda - Golden Apple storekeeper. Can provide you with smuggler's coins
although it's far more lucrative to loot and kill blood sailors for
them...
Exits
- South -> City Core, North West
Androd Estate
Part of Ophala's quest to return her "artwork". You'll find this
particular piece in Androd's main room with him.
Locked House
Encounter with Blood Sailors. Retrieve Calik's Orders and the Tavern Key.
Seedy Tavern
Bribe with smugglers coins or wear a blood sailor uniform. You'll also need
an auction announcement.
Characters
- Jalek - Christov's guard. Jalek likes drinking games...
- Christov - not particularly talkative...
- Auctioneer - you can purchase normal or special items. Special items
require smugglers coins.
- Wittian - provides some information on Callik
- Ulfnog - provides information on basement access. Password is
"cornerstone" and you'll require the tavern key (from locked
house).
Blood Sailor Hideout
Lots of combat. Ultimately ou'll find Dara'nei. She will provide information
on Callik and Vengaul. You will also get her Locket which is required to get
through the silver Sails Trading Company to find Callik and Vengaul.
Silver Sails Trading Company
Key area to finding both Callik and Vengaul. Also one of the tougher battles
- there is a wraith spider among others guarding this area. It drains levels in
addition to major abilities. Use Dara-nei's locket to open the locked down and
access the aqueducts.
Aqueducts
Provides access to the tomb as well as sewers where Callik and Vengaul can be
found. Talk to Charon who is guarding the boat and he'll give you information on
the aqueducts and how to find Callik and Vengaul. Use the ceremonial sword (from
Briley in Peninsula) to access the tomb.
Characters
- Charon - guards the boat and provides access to the sewers.
Tomb
Retrieve one of Never's artifacts (Ancient Symbol of Tyr). Return the
artifact to Oleff for a reward.
Sewers
Enter to find both the old and new guards of the blood sailors squared off
for a fight. You will have to fight Callik; you can choose to fight or negotiate
with Vengaul. The cockatrice is dead.
Characters
- Callik - fight him and his guards. Gain the amulet for Hemmel Masterson
as well as some faerie dust.
- Vengaul - provides the cockatrice feather. Return it to Aribeth.
Beggar's Nest
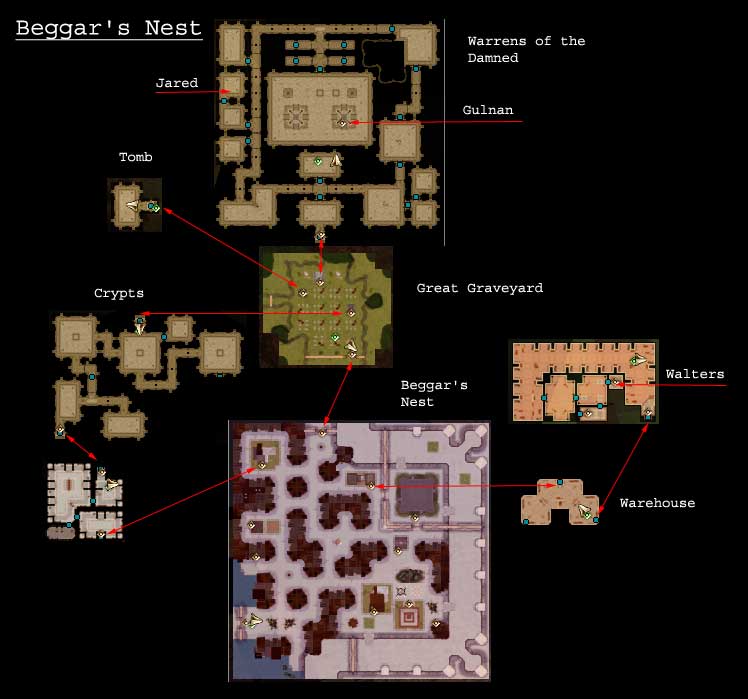
Zombie infestation. Meet up with Gate Captain Ergus for access and a quest.
Characters
- Gate captain Ergus - access and Walters quest. One of his guards,
Walters, has gone missing.
- Marcus Penhold - or his dead body... Take his named belongings (journal
and staff) to Bertrand in the Temple of Helm for a reward.
- Aldo - "hector" and the wheel quest. Hector can be found in
the Thomas Wheelright Wagon Repair. Return him to Aldo.
- Krestal - can be found in the south-eastern barricaded house
- Harben - provides you a reward after killing Gulnan (and telling him).
- Jemanie - missing brother quest (Torin). He's in the western barricaded
house. Information on the cult and creature who heads it. Provides you
with the Estate Ward Stone (required to access the Snake Cult Crypts).
Return with Torin's ring to complete quest.
Exits
- West -> City Core, South East
Snake Cult Crypts
You need the Estate Ward Stone from Jemanie to gain access from the main
Beggar's Nest. Lots of zombies and lots of treasure. Gain insight into the
plague and the zombie army. Find a gargoyle skull in one treasure pile.
Great Graveyard
Access to the Snake Cult Crypts, Warrens of the Damned, and the Tomb. The
Tomb can be entered by placing the ceremonial shield (from Briley in Peninsula)
in the chest.
Tomb
Retrieve one of Never's artifacts (Ancient Chronicles of Halueth Never).
Return the artifact to Oleff for a reward.
Warrens of the Damned
More zombie combat until you meet up with the leader, Gulnan. Tough battle as
Gulnan will summon high-level monsters to defend herself. Concentrate on her and
when she is dead, all of the zombies disappear (not just on this level, but
throughout the Beggar's Nest). You'll find an ancient key (UNSOLVED).
Characters
- Jared - zealot. Provides information on the cult and it's leader, Gulnan.
You can choose to release him. Or not.
- Gulnan - Yuan-Ti. Take her heart back to Aribeth. You'll also gain
special holy water from her death.
- Torin - his corpse. You'll find an ancient key (UNSOLVED) as well
as his ring. Take his ring to Jemanie to complete that quest.
Warehouse
You'll find Walters on the second level. There is an additional level but
it's blocked off magically (UNSOLVED).
Finale
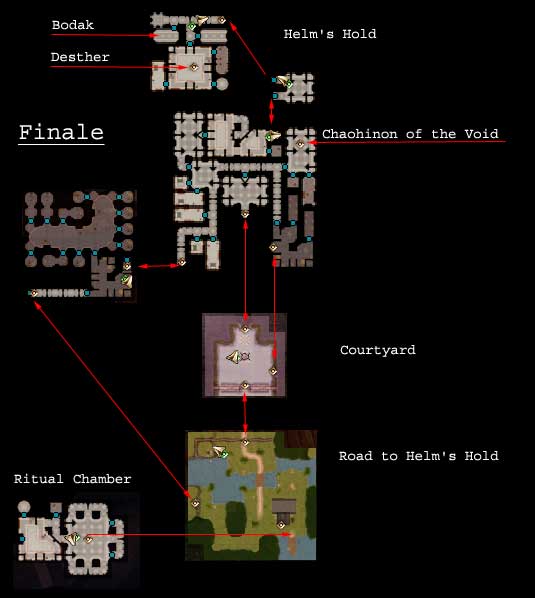
The chapter one finale is triggered by retrieving all four reagents for
Aribeth. Talking to Aribeth and selecting the ritual option will transport you
to the ritual chamber.
Ritual Chamber
Trigger the ceremony by talking to the characters as indicated to you (Lord
Nasher, Desther, Fenthick, Aribeth). At this point, Desther reveals himself as
the traitor and you must follow him through the portal to the road to Helm's
Hold.
Road to Helm's Hold
Teleportation landing spot. Talk to Bregan for background on Desther and the
recent activities. There are two ways into the hold. One is via the cave to the
west while the other is via the road and courtyard.
Helm's Hold
Battles are extremely difficult - mages and priests are prevalent.
Characters
- Aribeth
- Fenthick - reveals himself as a sympathizer to Desther. Within Helm's
Hold you will meet up with him again.
- Desther - reveals himself as the traitor during the ceremony. Confronted
in the Hold, Desther is as tough as the intellect devourer of the prison.
He cannot be killed but will be wounded through combat and will surrender
after quite some time.
- Lord Nasher
- Bregan - background on Desther and the roads travelled.
- Dumal - paladin held in the hold; provides some background on activities
- Yari the Knife - part of the force that overran the Hold. Can choose to
free, imprison, or kill him.
- Chaohinon of the Void - demon who took the Hold for Desther. You can
free and receive a magic item or banish. Place the Black Grimoire (found
in room to the south of Chaohinon) on the stone to initiate this activity.
- Bodak - unknown but dangerous combat. If you have not defeated Desther,
this is one of the more challenging battles as Bodak can instantly kill
any henchman. If you have defeated Desther, this room is empty save for
the treasure chest.
Chapter Two

Port Llast
Starting point for chapter two. You begin within Kendrack's Barracks.
Characters
- Larana
- Aribeth - next set of major quests.
- Show letter retrieved from Solomon as initial proof of the cult
- Note from Jaheel/Neva (Charwood) as proof of the cult
- Cult Journal from the Village mysterious man as proof of the cult
- Relmar's journal from the Realm of the Spirit as the final proof of
the cult existance
- Ongoing conversation's after quests and additional levels are gained
provide you with "Aribeth's Ring"
- Aaringend - provides details and quest requirements from Aribeth;
Provide two separate sets of leads to prove the cult existence. Once you
have retrieved the notes required, Aaringend will provide information for
moving to the next Chapter.
- Kendrack - provides training or lets you join a guild (if you are
inexperienced). Once you have completed the werewolf quest, return to
Kendrack for the Bounty Hunt quest. You need to find five escape
criminals:
- Zor - a Minotaur, likely in Luskan. In the Green Griffin Inn (the
inn itself) on level 2
- Stirge - gnome thief, likely on the South Road. In the old tree
hollow.
- Wyvern - elven bandit, likely in the Neverwinter Wood. Found just
west of the druid encampment.
- Delilah - halfling assissin, likely in Luskan. In the archeologist
barracks on level 2
- Yesgar - half-orc. Cannot be found prior to finding and returning
the previous four ears to Kendrack. Yesgar then kidnaps Kendrack's
daughter and takes her to the Port Llast Mines. Kendrack gives you a
key to gain entrance.
- Farmer's Son - outside of Kendrack's Barracks and provides you with a
quest to return his mother and rid the northern area of monsters.
- Shady Character - outside of the dockhouse and sells magic
- Prichev - within the dockhouse; wants you to convince the captain to
take supplies back to Neverwinter
- Captain Mung - needs "persuasion" of some kind to take
supplies to Neverwinter
- Solomon - provides you with a ring for your services in saving
Neverwinter. The ring, in actuality, is a tracking ring and Solomon will
turn on you as you move through the North Road area.
- Ballard - ranger, provides you with a quest. Seek Aawill the druid to
help quell the animal unrest. Also provides you with supplies
- El Toora - provides you with supplies but you need reagents to talk to
her
- Darktongue Breakbone - in the inn; provides information on the cult.
Turns on you at Green Griffon Inn.
- Alhelor - inn; provides information on lycanthropy and
cures/prevention
- Ander - inn; provides background on werewolf quest once you've spoken to
Neurik. There are four werewolves that need to be found to complete this
quest. See Neurik after finding the three boys and then go to the werewolf
cave in the Green Griffon Inn area to find Karathis.
- Bran - on the road to Charwood. Due south of Port Llast in the
North-eastern cave. Right at the very end, of course...
- Geth - in the Neverwinter Woods. Found on the East Road.
- Urth - upstairs in the Outlying Farm in his parents house.
- Karathis - in the werewolf cave on the Green Griffon Inn map.
Provides a journal indicating that Alhelor is the Black Wolf. Take
journal to Neurik.
- Elaith Craulnober - inn; information on elves; gem recover quest. Need gems
from Wanev (provides a key to Wanev's house), Zamithra, and Setara
- Wanev's gem is found in Wanev's Summoning Chamber; access to
the tower gained either from the cellar in the South Road or by using
Wanev's Wardstone found in Wanev's House. Follow the maps to the
Summoning Chamber
- Setara's gem is found in Setara's house in the Neverwinternight
Wood, Heart of the Forest. She requires the Mirror of Vanity from the
Nymph in the Neverwinternight Wood, Deep Woods.
- Zamithra. In the Green Griffon Inn, must be seduced and tricked.
- Jaheel - found outside the inn; wants you to find her little brother
Neva who was captured in the South Road area. Neva and Jaheel are actually
agents of the cult and will attempt to ambush your character on the in the
Charwood Standing Stones area.
- Neurik - priest in the temple, gives you werewolf quest and charms to
cure each afflicted person. Once you have cured the three boys and
returned Karathis' journal, visit Alhelor. He will then retreat to his
house and must be killed there. Return to Neurik with Alhelor's tooth.
- Thurwin - inn; after completing many of the quests, will appear and warn
of you of assassin named Vardoc. Talks about how dangerous it is to fight
the cult... He will turn on you later in this chapter and attack on the
East Road.
Exits
- North -> North Road
- East -> East Road
- South -> South Road
Wanev's House
You need the access key from Elaith to gain access. Pickup all special items
as the "stew" recipe requires Slaad tongue, fire beetle belly and 2
skeleton knuckles; place it in the brazier. This opens up a doorway to a secret
room. Gain Wanev's Wardstone (for Elaith quest). Information on Wane'vs Tower -
use the gong to empty out the barracks where the secret portal lay.
Outlying Farm
Strange son; no access to the room until you gain the werewolf quest from
Neurik.
North Road
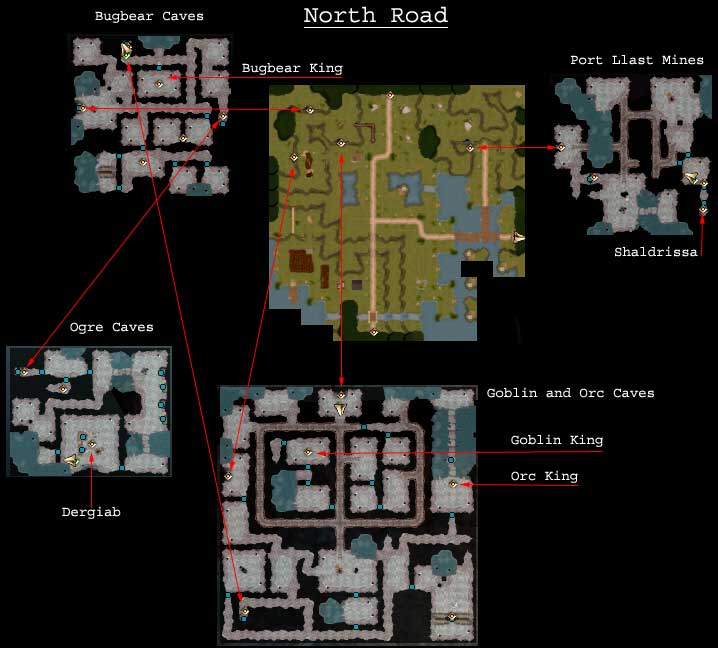
Recommendation from Aribeth to start cult quest in this direction.
Characters
- Gerrol - father of farmer's son in Port Llast; quest to return his wife
and ogre's head (Dergiab)
- Solomon - warns you of the cult and then turns on you
Exits
- South -> Port Llast
- East -> East Road
- North -> Green Griffon Inn
Bugbear Caves
Meet up with the tortured bugbear in the prison area; he talks about the
chief. Leah (farmer's wife) is in the prison. Fight the bugbear king.
Goblin and Orc Caves
Fight both the orc and goblin king
Ogre Caves
Meet with Nuglat in prison; provides background on the ogre alliances. Fight
with Gergiab and Gannon (member of cult). There is a portal that leads back to
the north road close to the caves.
Port Llast Mines
Access is restricted by key. Kendrack gives you the key once you have
retrieved the four ears from the bounty hunter quest. Gain key to free
Shaldrissa either from the chest in front of her cell or from Yesgar.
South Road

The South Road takes you to Wanev's tower and provides access to the Charwood.
Characters
- Lark the Troll - Brainless troll who provides access to Wanev's Tower if
you have the Wardstone from Wanev's house
Exits
- West -> Port Llast
- East -> Charwood
- North -> East Road
Cave - Maegel
Retrieve the Treatise book from the corpse. You'll need to swim through the
well, use the endurance potions you find for swimming if needed. On the other
side of the well, you'll find the Remains of Maegel; pull on the chain to make
him appear. Answer is "mirialis clan", gained from the Treatise book.
Wanev's Tower
Holding Wanev's Wardstone eliminates most of the combat within the Tower and
provides easy access. Access can be gained without the Wardstone via the cellar.
Go to the second floor and fight Wanev; he will quit when he is close to death.
He will give you a quest to kill Gulgash the Imp and return his Summoning
Chamber to him. Use the Lever to weaken the demons. Once you have killed Gulgash,
put his heart in the Brazier next to the portal and it will seal. Take Wanev's
Gem. Return and talk to Wanev for additional experience and treasure. Take
Wanev's Gem back to Elaith.
Charwood
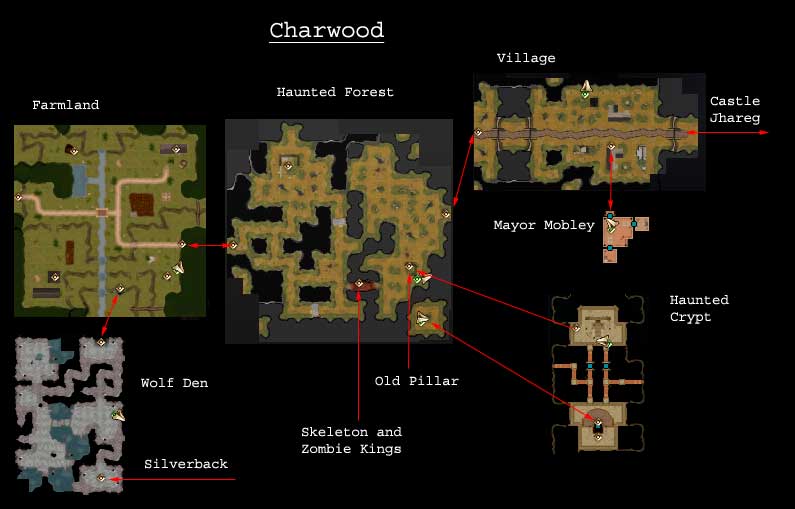
The Farmland area is the last "living" area of the Charwood until
after yu've completed the Jhareg Tower quests.
Characters
- Pete O'deel - Dire wolf quest. Kill Silverback (head of dire wolves) and
return back or barter with Silverback.
- Silverback - intelligent and talking dire wolf. Still, an evil dire
wolf. Either kill or barter to prevent any further death's.
- Bandits - Neva, Jaheel and Tarran can be found by the standing stones.
All attack immediately on sight; pickup the note for Aribeth.
- Ingo - provides background on the Charwood area.
- Quint Jhareg - found in the Village. Quint (along with all others in the
village) speaks nonsense and repeats himself.
- Mysterious Man - found within the inn of the Village. Actually a member
of the cult and turns hostile. Provides you with the Cult Journal for
Aribeth.
Exits
Old Pillar
Clue to access is in the "old scroll" found in the north-west area
of the Haunted Forest as well as the Explorer's Journal. Touch the pillar and
answer as the scroll indicates: "NETHER SHALL RULE". The pillar
disappears and a portal opens up providing access to the Haunted Crypt.
Haunted Crypt
The only access is via the portal created after touching the pillar and
answering the questions (see "Old Pillar"). The portals within the
crypt will all return you to the portal by the Old Pillar. Lots of undead and a
fight with a Mummy Lord.
Village
None of the villagers makes any sense as you speak with them. All of them,
save the "Mysterious Man" in the inn are actually undead. They will
disappear (and are freed) once you complete the Castle Jhareg quest depending on
your handling of the situation (see Castle Jhareg for more). Many of the
villagers will also talk about the disappearance of the children.
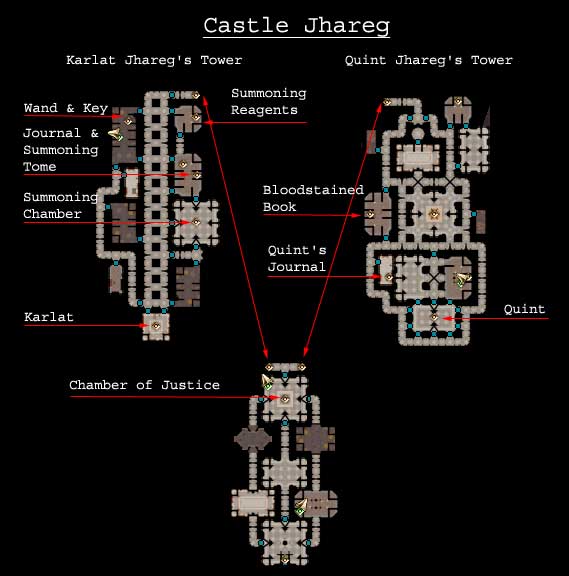
Castle Jhareg
There is a large chest in the entrance room. There is a riddle and riddle key
within it. Effectively there are 3 paths through the castle:
- West -> "Karlats" path, full of fire monsters
- East -> "Quints" path, full of undead
- North -> the "true" path, no monsters, some treasure chests.
The easiest way is straight north - there is no combat. You can only select one
path through - the riddle key disappears when you open the first door. The path
you take is irrelevant to the plot - take either east or west for substantial
combat and a powerful boss monster (and substantial experience points!) or north
for simplicity. All paths lead to the Chamber of Justice where you receive
background from the guardian and next steps. When you complete both Karlat's and
Quint's tower, return here. Upon returning, you should have two (Karlat and
Quint) or three (Karlat, Belial, and Quint) Oaths. You will have three options:
- Karlat guilty. Gain experience
- Quint guilty. Gain experience
- Neither guilty. Belial is summoned. You can then choose to either leave
the phylactery with the guardian (cursing all to remain undead) or take it
with you (freeing all). Taking it restores the Charwood to a simple forest
and provides you with extra treasure & experience as you exit the castle
and meet the mayor for the final time. The castle is sealed after you leave
regardless of your choice.
Karlat's Tower
Read all unique books and journals to gain clues to Karlat's judgment. It is
not critical to summon Belial (fire demon) but makes for a complete view and
gives you an additional option for judgment. Summoning Belial requires Karlat's
Protection Wand and a Fire Beetle's belly (reagents). The key provides easy
access to Karlat but the doors can be broken down as well. Obtain Karlat's Oath.
If you choose to summon Belial, obtain his Oath as well.
Quint's Tower
Read all unique books and journals to gain clues to Quint's judgment. Obtain
Quint's Oath.
East Road
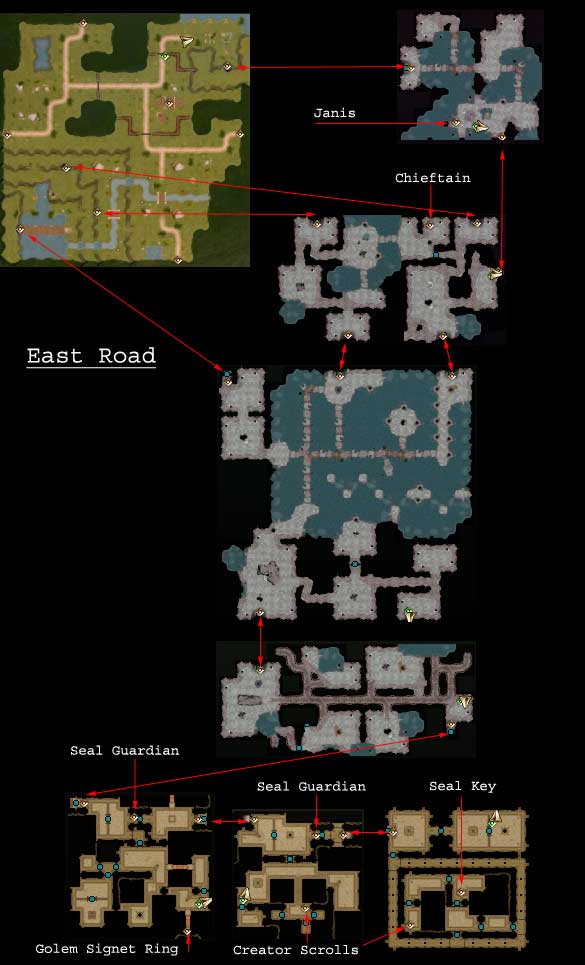
The East Road is primarily a junction point to other key plot areas. One
major quest involving a number of dungeon levels.
Characters
- Jax - Troll quest. Retrieve the book he has been searching for. Found in
the third level of the Creator Ruins - "Complete History of the
Creator Ruins".
- Revat - quest to find his mother. His mother is Janis and can be found
in the Troll Caves Storage Area. Gives you a ring - this is required to
free her! Touch the ring to her and she will be freed from her
imprisonment.
- Lenton - quest to retrieve a troll head trophy to show his brother has
been avenged. The head belongs to the chieftain in the Troll Caves Level 1.
Exits
- North -> North Road
- West -> Port Llast
- East -> Neverwinter Wood
- South -> South Road
Troll Caves
Kill the chieftain and return his head to Lenton.
Creator Ruins
Each of the three levels generally has a golem guardian who requires proof
that you are one of the creators before it will allow you to pass. The guardian
on the third and final level actually attacks you on-sight. Level one requires
the Signet Ring and level two requires the Creator Scroll.
Level three requires the Seal Key. After you gain entry, you will meet a
powerful Creator Sorceror. Once defeated in combat, he provide background on the
master race and queen. There is also a portal here that will take you back to
the entrance in the Troll Caves Storage Area.
Neverwinter Wood
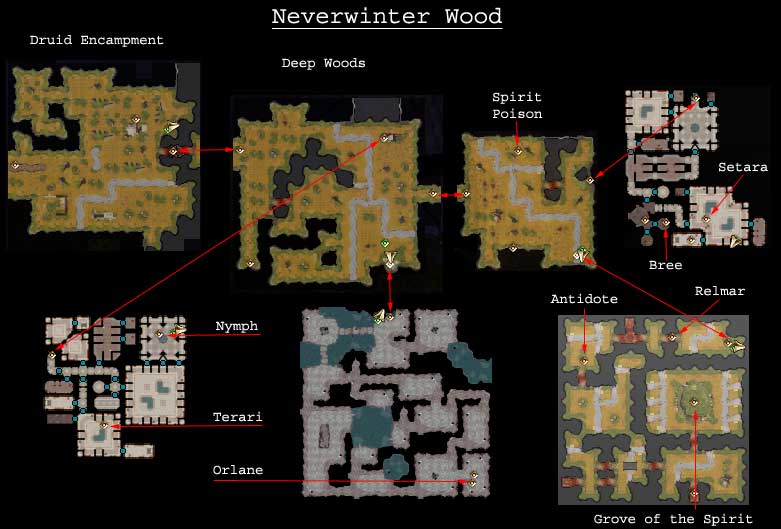
The primary quest is to find why the animals have turned evil and restore the
Spirit of the wood.
Characters
- Elgar
- Janken
- Welcar
- Jaer
- Dregin - guards the gate; you'll need the contract with Archdruid Aawill
to gain access to the deeper woods
- Archdruid Aawill - Spirit of the wood quest. Includes finding the three
druids sent in previously who have not returned. Return after finding any
or all of the druids as well as when you cure the Spirit of the wood.
- Orlane - can be found in the caves, guarded by a spider army and
queen...
- Bree - can be found in Setara's house
- Terari - can be found in the Nymph's home
- Henna - talks about Kend. You'll find Kend's tombstone in the Deep Woods
Exits
Nymph's Home
You will find Terari (Archdruid quest). The Nymph also provides information
on how to enter the portal as well as two key items - the ceremonial dagger and
mirror of vanity. The dagger is required to enter the grove while the mirror is
required to free Bree (Archdruid quest)
Setara's Home
You will find Bree (Archdruid quest). Bree's cell is locked and requires the
key from Setara. Setara will give you the key to her cell as well as Setara's
Gem (Elaith quest) when you give her the Mirror of Vanity.
Realm of the Spirit
Relmar provides background on Maugrim the Mage. You will have to fight him
once you finished talking; take his journal. You will find the antidote to the
poison as Relmar indicated. Fight the Spirit of the Wood and then cure when
given the opportunity. You'll be teleported back to the Heart of the Forest by
the waterfall that gave you access to the Realm. There is also a portal that
will teleport you there as well. See the Archdruid once you have completed and
take Relmar's journal back to Aribeth.
Green Griffon Inn
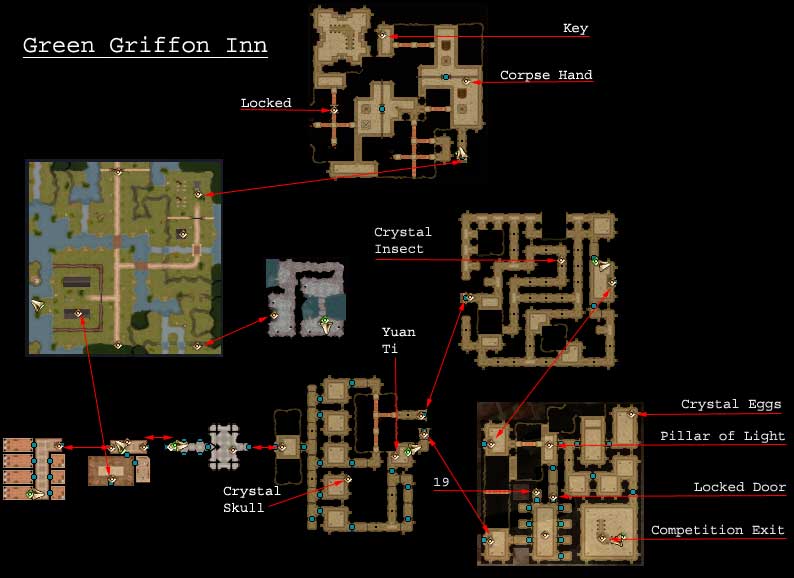
This area is dedicated primarily to the Challenge under the Inn as well as
connects to the next chapter (Luskan).
Characters
- Gam - in the Inn, talks about the the challenge. Met again on level 3 of
the challenge.
- Gorkan - in the Inn, talks about the challenge Attacks you on level 3 of
the challenge.
- Kasma - in the Inn, talks about the challenge. Killed on level two of
the challenge.
- Zamithra - retrieve the gem and give to Elaith (gem quest)
- Mutamin - talk about the challenge; gain basement key. Return to Mutamin
once you have completed all levels of the challenge.
Exits
Mutamin's Challenge
Level 1
Yuan-Ti riddle answer is 12 trinkets and 5 girls and gain the crystal frog.
Find the crystal skull earlier in another room.
Level 2
Find the crystal insect. Kasma will be killed. Fight the minotaur chief.
Level 3
Meet Gam and heal him. Talks about the pillar of light. It's extremely
useful and kills the invisible stalkers as soon as they enter that room. Find
the crystal eggs.
Gorkan attacks on-site.
Find Dydd dead with a note on the rooms and signposts. The sign posts &
statue indicate the correct door to open. If you cannot solve the riddle, note
that all but one of the treasure chests are trapped and cannot be disarmed.
The one untrapped chest is the only valid one, and contains the key to open
the locked door. Riddle answer is "19".
Put the appropriate trinket (crystal) in the chest next to the statue. The
correct trinket to use is the golden eggs. You will be teleported back to the
basement of the Green Griffon Inn. See Mutamin to close the quest.
Cave
Werewolf cave without the werewolves. You'll find a note fragment to help.
Caretaker's House
Gives you the key to the Arcane Brothers Tomb (graveyard).
Arcane Brothers Tomb
Fight Brother Toras, gain some treasure. Find a unique treasure (hand). UNSOLVED.
Chapter Three
Centered around the closed city of Luskan. The first major sequence of events
is to gain access to the tower.
Luskan
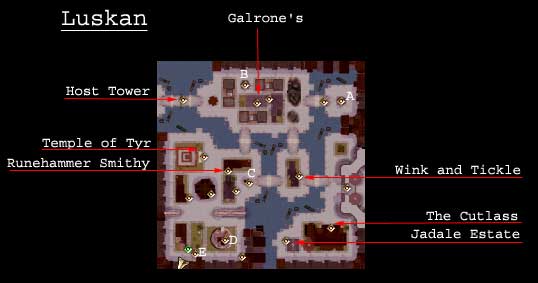
The city core. Fighting amongst the various High Captain's has left much of
the city in-ruins. You'll often encounter different factions and will be forced
to fight them all. Most of the unmarked buildings are simple slums, but visit
them all for experience and treasure. Some include locals who will provide some
basic plot information. Prior to confronting either of the high captain's, it
pays experience, treasure, and magic items to barter with the other. Both
captains are evil and should be killed, but by returning the head of one to the
other, you can profit from one's death.
Characters
- Gregor - guard. You'll meet him at the entrance fighting one of the
faction. He provides some background and can point you to the different
areas of interest
- Aarin Gend - in the temple. Talks about Aribeth's disappearance and the
need to get a High Pass from one of the captain's. The High Pass will
allow you to pass the wards and gain access to the tower. Return to Aarin
once you have killed one (or both) of the high captain's and he will
create a Diplomatic Pass from the Seal, allowing you to access the tower.
- Alaya
- Colmarr - the contraption quest. Talks about his lab in the sewer.
Return to him when you have completed his contraption and rid the sewers
of the undead.
- Smith - in the smithy. Basic store.
- High Captain Baram - undead lover. Found in the sewers.
- High Captain Kurth - fighter lover. Found in the docks.
- Bela - owner of Wink and Tickle.
- Rhaine - female prostitute, in the Wink and Tickle. Gives you the keys
to both Kurth's and Barath's base; wants to know when they are both dead
but disappears...
- Erb - in the Wink and Tickle. Ring retrieval quest. Needs his ring back
from Jadale.
- Oreth - male prostitute. ah, whatever...
- Yvette - female prostitute, in the Wink and Tickle. Quest to retrieve
her baby from Galrone. Visit Galrone in his house.
- Lady Jadale - in the Jadale Estate. Retrieve Erb's ring
- Aruph - innkeeper at the Cutlass
- Londa - in the Cutlass, Baram took her children. Quest to return them is
impossible (they are dead and lycanthropes). Give her the child's bear
from Baram's Lair to complete the quest.
- Elynwyd - in the Cutlass, her sister is held by Kurth. Gives you signet
ring to identify her; quest to free her.
Exits
Sewers
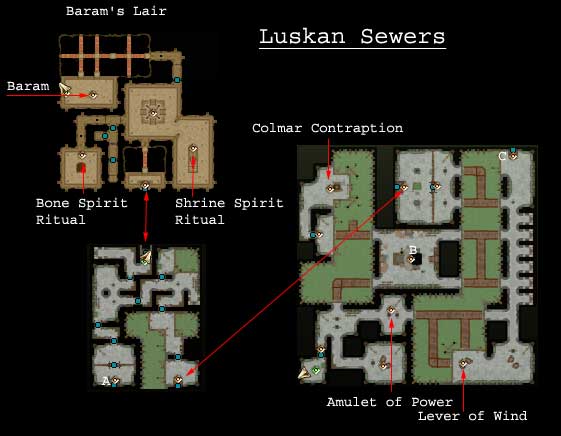
Street access comes from a couple of different areas within Luskan. Gaining
Baram's key from Rhaine provides access via another doorway. If you access the
sewers using Baram's key, you will be confronted with the projected image of
High Captain Baram. You can barter to kill the other captain (Kurth) or storm
past him and kill him in his lair.
Ghoul Outcast - Give him the Amulet of Power and gain the Sewer Control Key
and Lever of Water.
Retrieve all three levers and insert them in the proper place on the floor.
Pull the chain to activate the contraption; return to Colmar to complete that
quest.
Access Keys
- Baram's Key - required to get into the second level from the first level
of sewers; retrieve from Rhaine
- Sewer Control Key - required to open the door closest to Colmar's
Contraption; retrieve from Ghoul Outcase
- Vault Key - required to access the treasure vault in the SW corner;
retrieve from Londa
Levers
- Wind - Southern area of first level sewers, after large battle.
- Water - Barter and retrieve from Ghoul Outcast
- Stone - from the Wink and Tickle on level one. It's a locked room with a
guard dog.
Baram's Lair
You'll encounter Londa's nanny. She describes what happened to the children
and gives you a child's bear (quest item). Return to Londa and either tell her
the truth or lie to protect her. Access to Baram is blocked until you kill the
Yuan-Ti. The Yuan-Ti cannot be harmed and will continue to create undead until
you:
- Kill the greater mummy and all monsters by the Shrine Spirit. Gain the
Necromancer Journal
- Destroy the bone transmitters by the Bone Spirit; the Bone Alter then
self-destructs
- The Yuan-Ti can no longer summon undead and can be killed. Gain the
crypt key that opens the locked door and provides access to Baram.
Take the High Captain's Seal and Baram's head (if you took the quest from
Kurth). Destroy the gargoyles as per the notes you've picked up.
Kurth's Base/Docks

There are two ways onto the docks. One way is via the Luskan doorway. You'll
encounter Kurth's projected image and be blocked from any further access to the
docks. You can barter with him for the head of Baram. The other way is via the
locked tower, provided Rhaine has given you the key. The locked tower leads
through the sewers and a massive battle when you reach the dock level.
Kurth's Lair
Just north of the entrance you'll find some book-burning goblins. There is
nothing critical (Burke's Manual can be found later in his room) but you should
kill them and search the room for scrolls and the manual. The manual tells you
how to close the portal. You'll need the Glowing Sphere and Smooth Token to do
so.
Tolon - provides background information on Kurth and the demons you'll face.
Kurth - this is a serious battle. High level demons, summoned monsters, and
Kurth himself makes this one of the more difficult battles yet. Retrieve his
head (if you have made a deal with Baram) as well as his captain's seal. Close
the portal using the Glowing Sphere and Smooth Token. Free Evaine and return to
Elywyd to complete the quest.
Ruins of Illusk
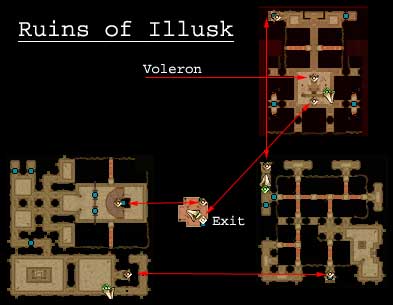
Access to the ruins is via the docks; the house is labeled "abandoned
house". This is a side quest, but with some spectacular battles and good
treasure. There are three levels and actions required:
- Level 1: Place the Skull Warrior's Head on the altar
- Level 2: Place the Hero's Heart on the altar
- Level 3: Place the Blessed Water on the altar
On level one, there are two levers. The double floor lever releases a flesh
golem that will kill zombies. The single lever unlocks the gates. Voleron can be
found on level three. There is a portal that returns you to the Ruined House.
Host Tower
The Host Tower, or Wizard's Tower is effectively additional plot development
without any formal quests. Quite a bit of fleshing out occurs - you'll find more
background on the attacks on Neverwinter, the powers behind it, and what the
deal is with Aribeth...
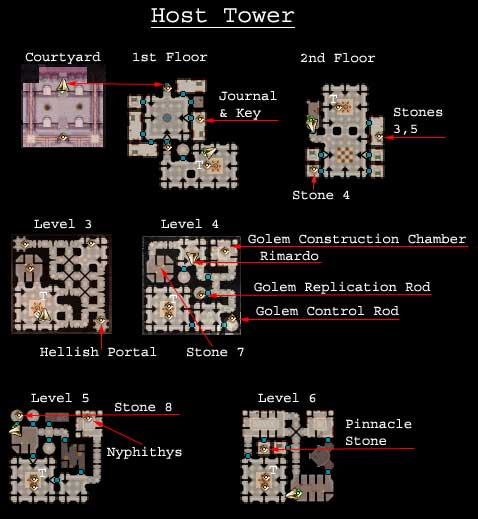
Courtyard
Starting point - you will gain access from Luskan and the forged seal. Give
the Seal to the guard to open the gates to the courtyard. You'll meet Captain
Islund who will also require the seal. He'll provide a huge amount of background
information on the tower.
Ambassador's Quarters (1st Floor)
You'll meet the two key army leaders - Yeanasha and Gurak. They'll provide
background information on the pending Neverwinter assault, their role, and also
Aribeth's role. In one of the room's you'll find Aribeth's journal (it provides
additional background) as well as the Tower Entry Key. You'll need that key to
get to the first teleporter. The teleporters are like elevators with one special
twist - you need to be hoslding the special portal stone for any given floor to
gain access to that floor. None of the stones are particularly well hidden but
you do need to visit most floors and explore fully to find them (they are marked
on the maps).
2nd Floor
You'll find portal stones for the 3rd through 6th floors
3rd Floor
There are several portals that allow demonic creatures to flow through to
this floor along with notes on how to close them. These demons refill the rooms
very quickly...
4th Floor
The first substantial battle with a wizard and his army. You'll absolutely
need the golem on your side. Gather the Control and Replication rods and insert
them into the construction chamber. It will create a helmed horror that will
fight for you. It smashes down the locked door and attacks. Tough battle!
Golems, wizards, and Rimardo. Rimardo is extremely tough. When you beat him, you
can negotiate information and treasure and then deal with him as you see fit.
You will also find the portal stone for the 7th floor after that battle.
5th Floor
You'll encounter Nyphithys. You can choose to free her or not. Destroy the
brazier to free her and she searches for Arklem (who is now a lich).
6th Floor
You'll find two stones here - one for the 8th floor and one for the pinnacle
(10th floor)
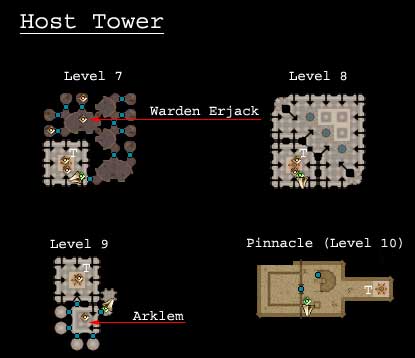
7th Floor
Warden Erjack holds the prison key and another pinnacle stone. You'll
encounter Deltagar who will provide background on the tower. There are a number
of tough creatures in the cells, including a lich.
8th Floor
Lots of combat
9th Floor
You'll meet Arklem. He was one of the wizards of the tower but is now an
imprisoned lich. You can free him by destroying the four braziers. He will then
open up the door to the pinnacle portal room and ultimately Maugrim. Destroying
each brazier releases a tough monster, so do not destroy all four without
returning to Arklem to fight the single monster released.
Pinnacle (10th Floor)
The gates are locked until after Maugrim has finished talking and disappears.
You can also use this time to visit his lair by going down the stairs (not shown
on map, very small room). Once you have completed this level, return to the
temple and talk to Aarin about your findings.
Maugrim's Lair
Good treasure and Maugrim's Journal. Provides background on Aribeth and
Neverwinter.
Beorunna's Well
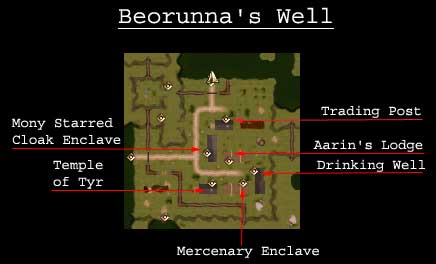
Beorunna's Well is the next major base of operations. You'll begin in Aarin's
Lodge where Aarin will provide the key quest points. You'll also find the
standard selection of henchman.
Characters
- Aarin - found in his lodge. Provides the major quest points for this
chapter. You'll need to find the Words of Power and return. Once you've
found all three, you move to Chapter Four in the story.
- Word of power - found in the Snowglobe quest
- Word of power - found on Klauth in the fire giant dungeons.
- Word of power - found in the Creator Race Ruins
- Lillian Cambridge - found in the Drinking Well. She is to provide you
information on the first Word of Power but first wants you to solve the
Snowglobe Quest.
- Snowglobe Quest - Nax the wizard has taken it from Lillian. She
provides you with a teleport scroll to gain access. Nax is in the
Wizard's Grove. Once you retrieve the snowglobe and give it to
Lillian, a portal is opened in her room (second floor) on the
pedestal.
- Averik - found in the Drinking Well. Says little until you've spoken
with Neurik about the Rolgan trial. After the Rolgan quest has been
initiated, he will talk extensively about what he saw
- Barkeeper in the Drinking Well
- Lodar - found in the Drinking Well. Says little until you've spoken with
Neurik about the Rolgan trial. After the Rolgan quest has been
initiated, he will talk extensively about what he saw. Buy him drinks -
this is crucial to successfully closing this quest. After several drinks,
Lodar gives you the crucial evidence for the trial
- Rolkid - found in the Mercenary Enclave. Provides you with the Supply
Line quest
- Supply Line quest. Retrieve the heads of two named orcs and return to
him. Once you have retrieved the first two heads, he quests you to
retrieve King Obould's head. King Obould cannot be found prior to this
quest.
- Vaath can be found in the Coldwood.
- Guzud can be found in Fort Ilkard, in the caves.
- King Obould can be found in the Moonwood - A, in the caves.
- Jevon - found in the Mercenary Enclave. Says little until you've spoken
with Neurik about the Rolgan trial. After the Rolgan quest has been
initiated, he will talk extensively about what he saw
- Zed - found in the Mercenary Enclave. Says little until you've spoken
with Neurik about the Rolgan trial. After the Rolgan quest has been
initiated, he will talk extensively about what he saw. He is also injured
but will not talk about it yet.
- Neurik - found in the Temple of Tyr. Provides healing and equipment, and
quests.
- Rolgan Trial quest. He gives you the Defence Council Journal and
tells you who to talk to. The two key people are Lodar and Zed. Lodar
is crucial as his evidence is the only evidence that will free Rolgan.
Trial strategy basics - don't talk about being drunk nor racism.
Specifics per person:
- Lodar - ask whether he saw who started it; ask about the spiked
drinks
- Zed - ask whether he saw who started it; ask about the spiked
drinks
- Vanda - ask why she sent her husband
- Rolgan - do not question
- Closing arguments. Talk only about the spiked drinks and that
no-one saw who started it. You will see all five torches glowing.
- Edegar - found in the Temple of Tyr
- Rolgan - found in the Temple of Tyr before his trial and outside in
Beurunna's Well after (assuming he survives his trial...)
- Sergol - found in the Temple of Tyr. Provides you with the Stone of
Recall if necessary.
- Eltoora - found in the Mony Starred Cloak Enclave. Sells magic and has a
lab to create magic items if you have a wizard class
- Husher Clay - found in the Trading Post. Provides the Star Sapphire
quest.
- Star Sapphire Quest. Find and return the Star Sapphire, found in
Layenne's Tomb
- Barun Silverblade - found in the Trading Post. Can create magic items if
you have the reagents; provides you with a recipe book.
- Yusam - found in Beorunna's Well. Provides information on the Elk tribe
and Rolgan's trial.
- Quests you to investigate the Uthgardt and return with information on
why they are acting strange. Return with the Dreamcatcher from Zokan in
the Uthgardt Fort.
- Dalcia - found in Beorunna's Well. Provides information on Rolgan's
trial.
- Endar - found in Beorunna's Well
- Palla - found in Beorunna's Well. Provides information on Rolgan's
trial
- Vanda - found in Beorunna's Well. Provides information on Rolgan's
trial
Exits
- North -> Coldwood
- West -> Moonwood
- South -> Fort Ilkard
Coldwood
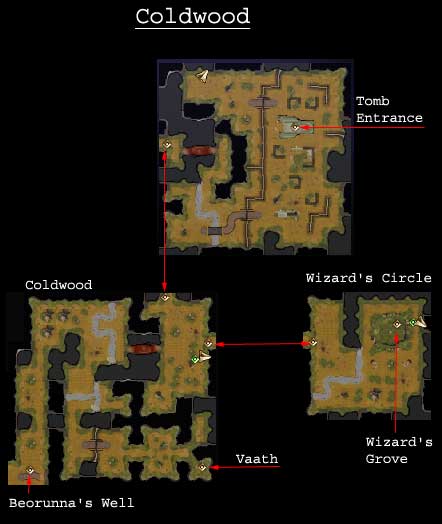
Forested area that closes some minor quests and leads to information on the
Words of Power. There is a Cult Leader at the entrance to the Wizard's Circle
who will provide a Cult Journal and some background. Access to both the Wizard's
Grove and Layenne's Tomb.
Characters
- Delvar - at the entrance to Coldwood. Talks about both the orc bandits
and the portal to Wizard's Grove.
Wizard's Grove
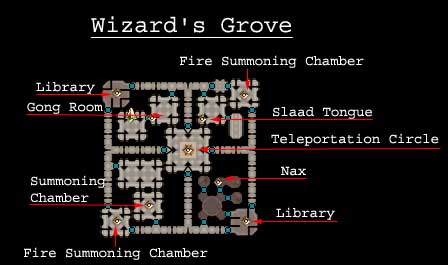
You'll need the teleport scroll from Lillian to gain access to the Grove.
Destroy all four pedestals in the Fire Summoning Chambers to prevent any fire
creatures from being summoned. The libraries contain information on how to
summon water creatures. Access to the Snowglobe is via the Gong Room. Ring them
as per the order below:
|
Dragon (4) |
Bear (3) |
|
|
Dog (2) |
Puma (1) |
|
You'll find the Snowglobe in the next room (the door unlocks after the gongs
are rung in the proper order).
Characters
- Nax - locked in a prison cell. It is entirely optional to free Nax as
you can gain the Snowglobe without his help. Freeing him involves the
summoning chamber and some reagents as per the Nature of Water Summoning
book.
Snowglobe
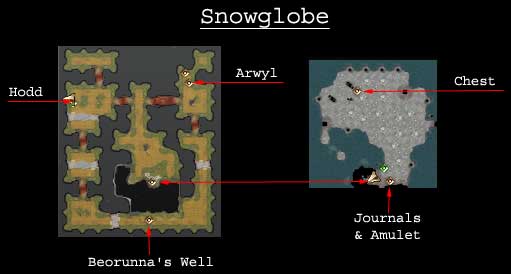
This is the world of the Snowglobe, accessed via the second floor of the
Drinking Well after completing Lillian's quest. You can either enter the world,
or "switch" the worlds by rotating the globe. You'll see that either
the dwarves or the dryad's are evil after each switch.
Characters
- Arwyl - leader of the dryad
- Hodd - leader of the dwarves
- Guardian White Dragon - "master" of this world, found in the
cave
You'll need to go into the cave, retrieve the journals and amulet, and then
fix the amulet prior to attacking the White Dragon. Seriously. I'm not kidding,
that damned dragon is nearly invincible prior to fixing the world up. You'll
need Hodd to fix the amulet first, so if the dwarves are evil, return to the
Inn, rotate the globe, and then return. Return to the Inn, rotate again, and
visit Arwyl to completely fix the amulet. Wear the amulet and go after the
Guardian Dragon. The locked chest opens. You'll be visited Haedraline, a
lizard-projection who will provide some background on Maugrim. Take the Word of
Power and return to Aarin in Beorunna's Well.
Layenne's Tomb
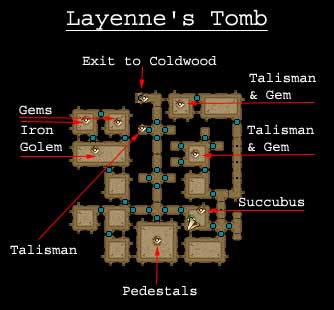
Solving this dungeon provides you with the Star Sapphire. You need to
retrieve four gems (misery, pain, duty, and honor) and place them on the
pedestals in the southern room. Match the colours and inscription details to the
individual gem. Once completed, the Star Sapphire appears on the middle (fifth)
pedestal. Take it back to Husher Clay in Beorunner's Well to complete this
quest.
There is an Iron Golem guarding two of the gems. Destroy all four of the
glyph generators and he will instantly die.
There is a smaller subquest where you can free a succubus. You'll need to
retrieve three talismans (ring, necklace, and stone).
- Ring - all doors are open (unnecessary as most doors will be open at
this point)
- Necklace - gives you magical treasure
- Stone - Succubus is free and attacks
Moonwood - A
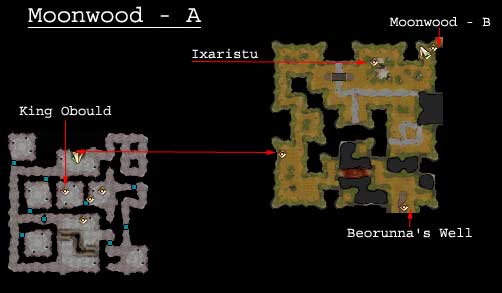
First section of Moonwood available from Beorunna's Well. Smallest of the
giant encounters - you'll primarily encounter some hill giants and ettins.
Caves
You'll encounter two drow commanders (tough battles) prior to Chief Obould's
Quarters. The Chief is not around until you've completed the first part of
Rolkid's supply quest. Rolkid gives you another quest - to return with the head
of Chief Obould. Only after this can you find the Chief in his caves.
Characters
- Ixaristu - Uthgardt Shaman. Talks about the giants stealing dragon eggs
and driving the uthgardt from their homes.
Exits
- North - Moonwood - B
- South - Beorunna's Well
Moonwood - B
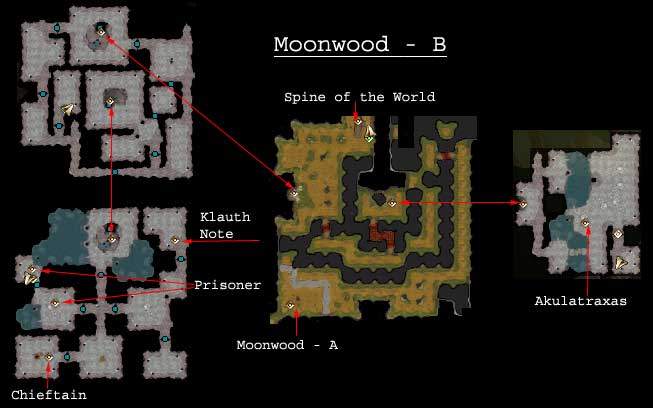
Tougher battles with giants. Hill giants very common and numerous in battle.
Several fire giants as well.
Exits
- North - Spine of the World
- South - Moonwood - A
Caves
The hill giant champion is extremely tough. Has healing potions and deals out
heavy damage. He's guarding the stairs down to the second level.
On the fire giant on the second level you'll find the note from Klauth
talking about dragon eggs and alliances. You'll also find the chieftain - take
his head once he's been killed and give it to Akulatraxas to complete a quest.
There are two prisoners that can be freed - both are captured Uthgardt warriors.
Dragon Caves
You'll meet Akulatraxas (green dragon). Complete a quest by returning with
the hill giant's head (second level of cave above). Akulatraxas will turn
hostile if you touch the door leading to her eggs...
Spine of the World

Filler adventures for the most part. The first cave is empty - remnants of a
battle between a brass dragon and many giants. Gorgotha (gold dragon) quests you
to retrieve the head of Klauth, an ancient red dragon. As with all the female
dragons, do not touch the door leading to her eggs or she will turn hostile.
Exits
- North - Fire giant lair
- South - Moonwood - B
Fire Giant Lair
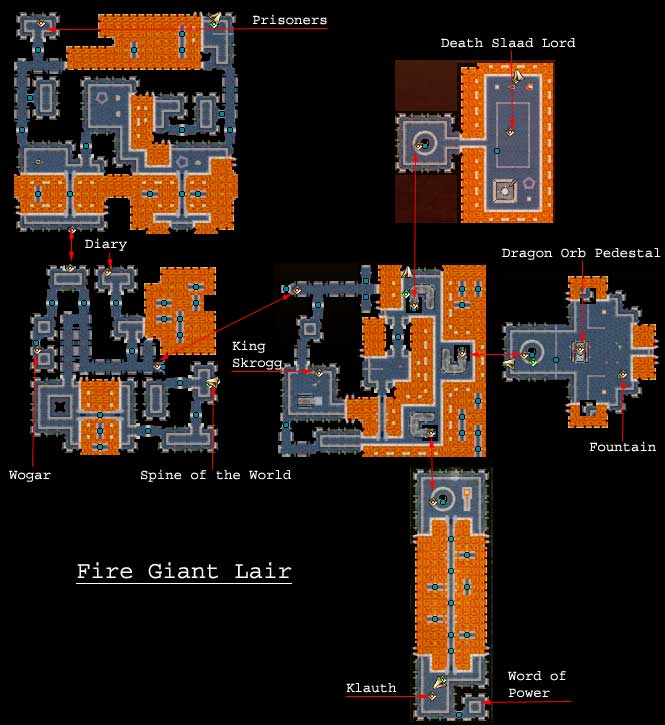
Large number of rooms. If you are interested in finishing quickly, you can
skip half of the map. The ritual book can be found in at least *4* places.
Effectively it talks about putting either a live dragon (keeps Klauth young) in
the dragon sphere or a dead dragon (damages Klauth) in the same sphere. All
required elements can be found in the same room. Brunhilda's diary provides some
background but no useful combat information.
Characters
- Wogar - advisor to Orc King. Found as a prisoner. Provides information
on Klauth and the "fast growing dragon eggs"
- King Skrogg - fire giant chieftain. You'll find one of the ritual books
as well as a pass amulet. He's not well guarded so the battle is not one of
the more difficult.
- Prisoners - sort of. These aren't prisoners - they will turn on you so
simply argue with them long enough until they become hostile and kill them.
Deeper Caves - Slaad Cavern
Notable for the Death Slaad Lord. He can constantly summon additional slaadi
as well as being generally combat-tough. You'll find the same ritual book as on
the king.
Deeper Caves - Dragon Lair
All of the components required to either help or kill Klauth are present.
There is a fountain which contains the dragon sphere (and another ritual book).
The dragon orb pedestal initiates the capture of the dragon - dead or alive. To
help Klauth, capture the dragon live. To kill Klauth, kill the blue dragon and
then capture the dead body. In either case, the Dragon Sphere absorbs the dragon
and can be picked up into inventory.
Klauth's Lair
You can talk freely to Klauth. Decision point - you can either steal eggs
from the good dragons and give them to Klauth or kill Klauth. Klauth is
extremely tough even when wounded. To kill, give Klauth the poisoned (dead
dragon in dragon sphere). Klauth then attacks but is gravely injured - the
battle is still tough but at least winnable at this point. Gather Klauth's head
(give to Gorgotha as proof) as well as the key that lets you into the treasure
room. You'll find a word of power in the treasure room as well as another
Haedraline visit. Haedraline provides additional background on the words of
power and history. A portal is also created that takes you outside the fire
giant lair back to the spine of the world. Give Aarin Gend the second word of
power.
Fort Ilkard
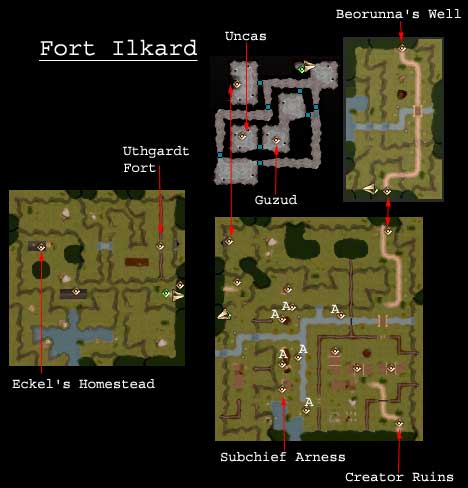
Smaller sub-adventures; primarily related to saving the fort from the
attacking Uthgardt and resolving the treaty issues.
Characters
- Commander Damas - found in the Commander's Lodge. Provides background as
well as quests:
- Catapult quest - destroy all catapults and ballista attacking the
fort. There are six, marked on the map as "A". Head west from his quarters
and you can destroy each one in sequence. Note that you must take out the
crew and commander for each catapult prior to destroying it.
- Return with the head of Arness.
- Return with the head of Zokan. Damas actually caused the plague for
the Uthgardt, so you can confront him with the evidence (as provided by
Zokan), gain the cure, and return to Zokan. Or you can kill Zokan and
return with his head. This will affect your allies and ability to complete
the earlier quest as per Yusam in Beorunna's Well.
- Eckel - found in the Settler's Barracks. Quests you to give a note to
his wife (turnip quest???) His wife can be found in the marked house to the
west.
- Galia - wife of Eckel. Found west in the Northern Homesteads. You will
meet her as she is being attacked. Give her the note from Eckel to complete
quest.
- Uncas - prisoner in the caves. He gives you a Feather of Peace to allow
you free access to the Uthgardt Fort
- Zokan - found in the Uthgardt Fort. Talks about the betrayal by Damas.
Offers an alliance if you can cure his people. Confront Damas with the proof
provided and return with the cure; gain the Dreamcatcher. Take the
Dreamcatcher back to Yusam to complete this quest.
Exits
- North -> Beorunna's Well
- South -> Creator's Ruins
Caves
You'll encounter the second orc raider - Guzud. Take his head back to Rolkid
in Beorunna's Well for proof and closure on the supply line quest (first part).
You'll also meet Uncas, an Uthgardt shaman. His provides you with a Feather of
Peace which allows you to wander freely within the Uthgardt Fort.
Uthgardt Fort
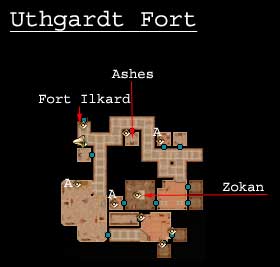
You'll encounter mixed resistance depending upon whether you received the
Feather of Peace from Uncas or not. With the feather, there is no fighting
required within the complex. There is also a series of locked doors that can
only be unlocked via special book-matching. There is a unique book found in each
area marked "A":
- Book about flight. Place it in the bookshelf missing a flying book and it
unlocks the nearest gate
- Book about swimming. Place it in the bookshelf missing a sea/swimming book
and it unlocks the nearest gate.
- Book about horses. Same deal, place it in the bookshelf missing a book on
this topic and it unlocks the nearest gate.
You will also meet several prisoners (behind locked doors). Free them, or
not...
Creator Ruins
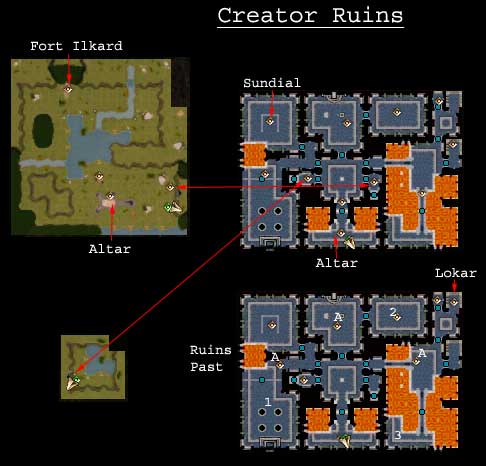
Location of one of the Words of Power.
Characters
- Lokar - found in the Past Ruins. Gives you a ring that makes the slaves
more friendly towards you.
- Sapphira - provides you with information on using the sundials to travel
back in-time to help her and weaken the guardians. If you don't weaken the
guardians, you can't kill them. She also gives you the gem to activate the
sundials and travel between past and present.
- Ultarg tree quest. Take the seeds back in time to the exact spot (it's
marked) and plant the seeds.
- Morag - daughter of the queen. Found in the Ruins Past, in the garden.
She provides background information but flees.
Exits
Ruins
There is Volcanis Oak Seed found near the Altar. Destroying
the altar prevents any further summoning. Please see
Reader's Feedback.
Creator Race Ruins - Present
You need to head to the Ruins Past, complete that level, and return before
you'll be able to get the Rune of Power. The golems need to be weakened and each
room provides clues on how to solve the riddles. At the entrance you'll find a
translation amulet (required to speak with the slaves) as well as a warning
about attacking the golems. You need to wear the amulet and not just have it in
your inventory. If you haven't spoken with Sapphire, you'll find the activation
gem next to the main sundial in the NW corner. The altar room is locked until
you solve all three riddles.
There are three guardians, one in front of each riddle. You must defeat each
golem to get the golem key and access to the riddle room. The riddles are solved
as follows. Once solved, the door to the altar unlocks. You'll have to fight a
Balor Lord. Gain the key to the altar from the Lord, and take the Word of Power. Haedraline
again appears and gives you the final piece of information on the importance of
the Words of Power. Return to Aarin in Beorunna's Well.
- Colour - you need to blend colours amongst the secondary pools. Take the
purple (one of three solutions) gems from the center well. On the primary
pools, push "red" on one side and "blue" on the other. Place one each of the
purple gems in the secondary pools.
- Sound - the fairy (Ruins Past) gives you the solution if you watched her.
You must touch each of the four gongs in-order, from one to eight. The gongs
are as they appear in the room; the numbers are the order you must touch them:
| |
4,7 |
GONG |
|
2,6 |
GONG |
|
|
| |
|
|
|
|
|
|
|
| |
3,5 |
GONG |
|
1,8 |
GONG |
|
|
- Smoke - there are six powders (three colours) that need to be blended in
the correct order:
- Yellow, Red
- Blue, Red
- Blue, Yellow
Creator Race Ruins - Past
There are three slave workers (marked on the map as "A") need to be convinced
to build weakened golems. You can pick the weakness (cold, fire, blunt, or edged
weapons). Each worker is building one of the guardians, so it's crucial you
convince all three. None of the riddles are complete at this point.
Go to the garden area and plant the Seeds (from Sapphira) to grow the tree in
the garden in the future.
Chapter Four
Back to the city of Neverwinter which is under siege from the Luskan army.
Parts of the city have fallen and the plot primarily involves battles leading up
to Maugrim and Aribeth conflicts.
Castle Never
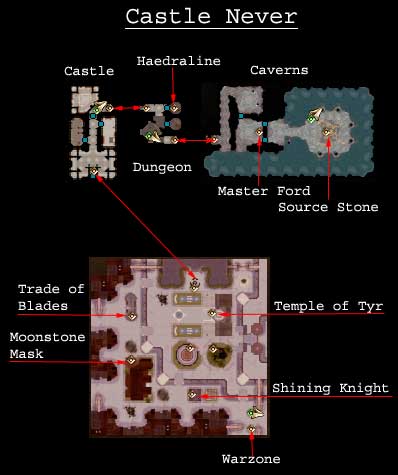
Starting point of chapter four. The castle and surrounding area are primarily
background and plot development; there is little action within the core itself.
Characters
- Lord Nasher - found in Castle Never. Provides background information on
the fall of Neverwinter. Talk about doom and gloom...
- Aarin Gend - found in Castle Never. Provides information on the stones
and key individuals to meet within the castle walls.
- Haedraline - found in the Castle Dungeon. Tells you about the fourth
stone - it's required to release or destroy the Source Stone.
- Return to her with the fourth stone. Maugrim has it.
- Master Ford - found in the Castle Caverns. Provides more background on
the stones.
- Oleff - Temple of Tyr. Provides you with basic supplies and can heal
- Durga - Shining Knight Arms and Armour. Provides weapons and armour
- Trancar - Trade of Blades. Provides the first quests in this area:
- Catapult destruction quest. Destroy the three catapults in the Warzone.
You'll need to kill the commanders and crew around the catapults, and then
simply click on them to destroy them. The catapults cannot be destroyed
while the commanders are alive.
- Kill the two wizards that are protecting the golems. The golems are
completely invulnerable until you kill the controlling wizards. One can be
found in the SW and the other in the SE section of the warzone. Once
killed, the golems are vulnerable to attack. The wizards can be found in
the houses marked on the map at sections "A"
- Luce - Moonstone Mask. Leesa quest:
- Leesa has run away; find her in the warzone.
- Ophala - Moonstone Mask. The Mask is no longer a brothel - it's now an
infirmary. Ophala will also trade goods and weapons.
Exits
Warzone

Very difficult area! The fighting is extremely tough, particularly with the
invulnerable golems running around with the giants. All houses that you can
enter are marked on the basic map. Each one will have soldiers in them but can
be used to rest once you've cleaned them out. The two houses marked with an "A"
are where the golem-control wizards (and a balor lord) are located.
Characters
- Asgard. Provides secret access to bypass the frontline of the battle.
The secret access leads to the south-western section of the warzone.
Exits
- North -> City Core
- South-east -> Strange courtyard and portal to Maugrim's Sanctuary
Maugrim's Sanctuary
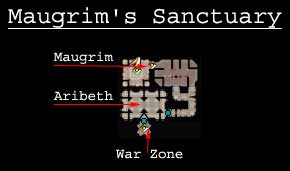
Both Aribeth and Maugrim can be found in his sanctuary. You have a choice
what to do when you defeat Aribeth - spare her or kill her. The fourth word of
power will be found in the treasure chest once you've defeated Maugrim. Return
the stone to Haedraline and she completes the background information on the
stones. Prior to entering the stone, stock up on potions as well as any weapons.
Source Stone Lairs

Lots of tough combat throughout the lairs. You'll encounter Morag on several
occasions but she will flee until in her lair with all of her guardians. There
are a number of rooms that seem to offer access to different worlds IF YOU ARE
HIGH ENOUGH LEVEL to access. Bit of a ripoff as the Monk character I played only
reached 17th level, even though all provided quests were completed... And you'll
need good hand weapons to fight Morag - sadly they didn't play test with a monk
character Morag is immune to empty-hand attacks.
Characters
- Asheera. Provides you with an artifact to help fight Morag. A helpful
artifact IF YOU ARE HIGH ENOUGH LEVEL.
- Morag Minions:
- Two dragons - Guardian Lair. Nasty. Badasses. These two are killer
difficult but your Recall Stone still works. Concentrate on one dragon
with your henchman. You'll need to kill both as each one provides you with
a key necessary to gain access (north) to Morag's Lair. Two locks, two
keys required.
- Chosen ones - Morag's Lair. Morag is in this room, briefly. You must
kill these followers to gain a key to get into her main lair.
- Morag's Hands - Morag's Lair. There are two of them - they appear when
Morag appears. Best strategy is to lure each one out individually. They
are tough individually and nearly impossible together. Trying to fight
Morag and the two guardians is suicide.
- Morag's egg sacs - Morag's Lair. You need to destroy each of these
(they turn into a monster when bashed) to get access to Morag's
Protectors. Hit and run again works well to keep Morag out of the fight.
- Morag Protectors - Morag's Lair. You need to destroy at least two of
the protectors - the first should be the "protector against the lessers".
The next one should be based on the weapon you are using (pity the fool
who, like me, picked a monk - there is no protector against unarmed
combat). You can only destroy the protector who is defending against your
current weapon, and that's the weapon you need to attack Morag with.
- Morag herself - Morag's Lair. Morag is invincible until you have
killed at least two of her protectors (as above). Hit and run tactics work
best as she has the ultimate in magic spells - let her exhaust her spells
while you continue to heal and attack the protectors. From there, it's a
matter of wearing down her protection (150 hp protected before she takes
damage) and then killing her. Once she has been killed, a portal opens up
that takes you to the Astral Pocket and the games end sequence.
- Haedraline - Astral Pocket. She speaks about the death of her race and
your saving of the world. End-game sequence begins as well as your character
is saved (game jumps back to main menu).
|